Smart SIM Registration
Getting your Smart SIM registered has become a necessity for every user in the Philippines. Whether you’re a long-time subscriber or just recently got your SIM card, the compulsion to register stems from the Republic Act No. 11934, which mandates this process. The registration process is designed to be easy and straightforward, ensuring that both new and existing users can quickly follow the steps. By registering your SIM, you not only comply with the law but also help protect yourself from online scams, frauds, and unwanted spam. The company encourages this to safeguard users and to maintain seamless connectivity for all.
To start the registration, you just need some basic personal information and eligible documents. By using the online link, you can fill out a simple form and get your SIM registered without any hassle. This process is also essential to ensure the service remains uninterrupted. The introduction of these methods reflects the government’s initial efforts to track ownership of SIM cards, especially due to the growing need for more sophisticated identification systems in the mobile networks. Ultimately, this is all about keeping your communication secure and staying connected without any worries.
How to Register Smart Sim (TNT)?
The easiest way to register your Smart or TNT SIM is to use a formal online link. This method is designed to help subscribers securely store and handle their personal information. Unlike traditional processes that often depend on manual data entry and paper-based documentation, this online system makes it simple and efficient. You just follow the right steps on the registration link to ensure everything is done correctly. By using this approach, the registration becomes much easier, allowing users to register quickly and safely.
Note: It’s clear that Smart and TNT are part of the same network and company, which means their registration process is the same. This implementation of the Smart SIM card registration brings many benefits for users and network providers, making it a useful step for everyone involved.
Enhanced User Security
One of the primary advantages of Smart SIM registration is the enhancement of security through biometric and real-time verification, making it much more challenging for any wrong stuff to occur.
Enhancing Compliance in Smart SIM Registration
The betterment of regulatory compliance through TNT SIM card registration is vital as regulatory bodies worldwide are increasingly focusing on the proper use of telecommunications services. This process helps telecom companies obey regulations and ensures that all subscribers are properly identified and verified.
Improving User Experience in Smart SIM Registration
The new system for Smart SIM registration streamlines the experience for customers, allowing them to register their network efficiently through automated processes. This innovation is all about reducing time and hassle compared to earlier methods.
Requirements For Smart Sim Registration
Before registration, make sure you have a valid ID, the required documents, and a recent selfie photo ready. This applies to Smart, TNT, Globe, and Dito SIM cards, as per the registration list guidelines.
Valid ID List
- Pic id card add
- Passport
- Philippine Identification
- Police Clearance
- Driver’s License
- Voter’s ID
- Government Service Insurance System E-Card
- Senior Citizen’s Card
- Social Security System ID
- Firearms’ License to Own and Possess ID
- National Bureau of Investigation Clearance
- Professional Regulation Commission ID
- Integrated Bar of the Philippines ID
- Overseas Workers Welfare Administration ID
- Bureau of Internal Revenue ID
- Unified Multi-purpose Identification Card
- Person with Disabilities Card
- Any other valid government issued ID with Photo
Required documents
- Your Name
- Your Date of Birth
- Nationally accepted ID Card with ID Number
- Smart Sim Number
- Selfie Photo
- Valid ID Card
- Nationality
- Your Smart SIM Card
Step-by-Step Smart SIM Registration Process
Registering your SMART SIM is a crucial process, especially with the SIM Registration Law in place. This guide will walk you through how to easily complete your Smart SIM registration with precision, ensuring all details are accurate. Whether you’re using your phone, tablet, or computer, here’s everything you need to know.
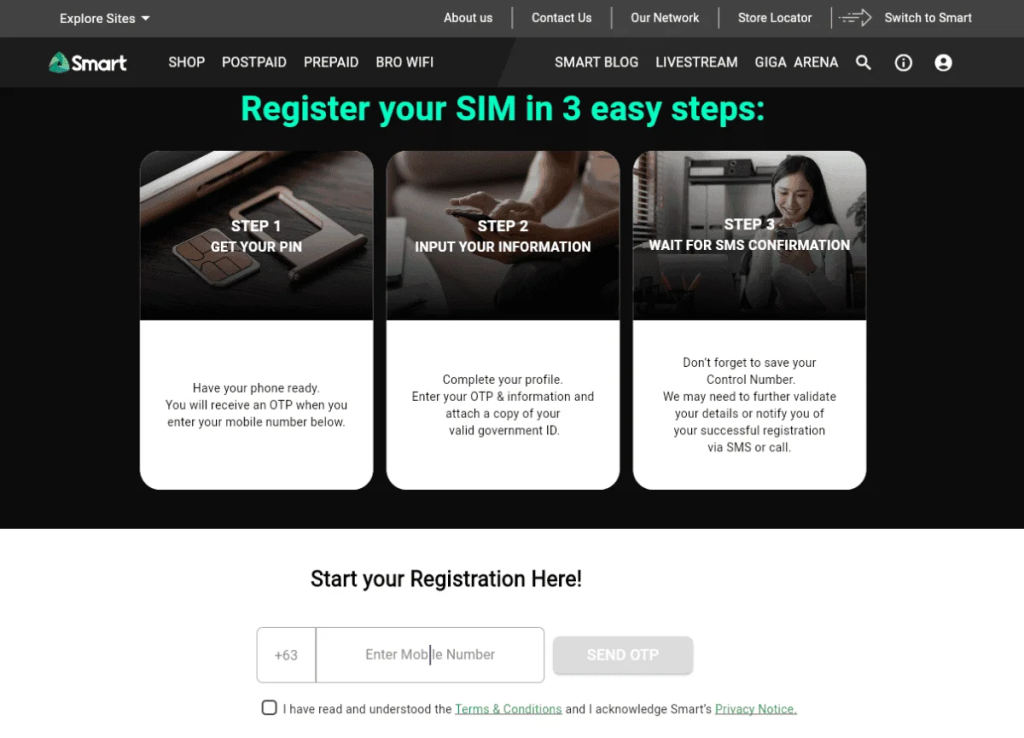
1. Begin Registration
Visit the Smart SIM Registration Portal by heading to https://smart.com.ph/simreg on your device. Once there, scroll down and find the start registration button.
2. Enter Your Mobile Number
In the form, you’ll see a designated field marked for your mobile number. Enter the phone number associated with the SIM you’re registering. This is important because Smart will send an OTP (One-Time Password) to the number you provide.
3. Receive OTP and Verify
After entering your mobile number, click the checkbox to agree to the terms and conditions, then press Send OTP. You will receive a text message containing a 6-digit OTP. Enter this code in the provided input field to proceed with your registration process.
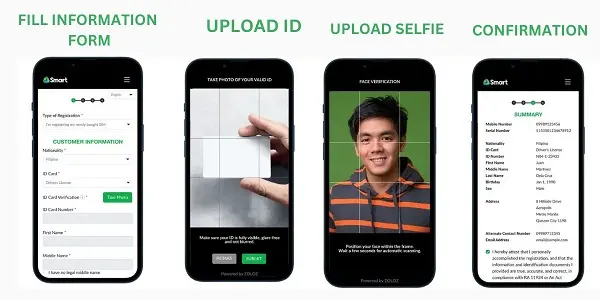
4. Fill Out Personal Details
Once the OTP is verified, you’ll be prompted to fill in your personal details, which include your full name, Date of Birth, Complete Address, Sex, and Nationality. Double-check this information for accuracy, as any incorrect or inaccurate details could lead to complications during identity verification or delays in the registration process.
5. Upload Your Government ID and Selfie
Next, you’ll need to upload a clear photo of a valid Government ID, such as a driver’s license or passport. Make sure the ID is not a compressed photo, as this could cause blurriness. You can use an online compression tool to reduce the large size of the image if necessary, but ensure the quality remains high. After uploading your ID, you will also be asked to take and submit a live selfie photo for further identity verification.
6. Submit and Receive Confirmation
Once all the necessary personal details and documents are uploaded, submit the form. Upon successful submission, you’ll receive a confirmation message with a reference number. It is imperative to save or write down this Control Number for future reference. This acts as proof of your registration and will be required to check your registration status.
7. Check Your Registration Status
After completing the registration process, you can easily check the status of your Smart SIM registration by dialing ** *1202# ** on your mobile device or visiting the portal again. Make sure your SIM card is officially active and that the details you submitted are valid, as Smart may contact you for further validation if additional information is needed.
How to Check Smart SIM Registration Details/Status Online
If you’re unsure whether your SIM card is already registered, there are simple ways to check the status. You can do this by *dialing 1202# or by using the Smart SIM registration tools. Follow these steps to confirm if your SIM is correctly registered.

1. Check by Dialing *1202#:
To quickly verify your SIM card status, just *dial 1202# on your phone. This will immediately tell you if your SIM is registered and if your active profile is set up. If your SIM isn’t registered, you will need to register it by following the steps mentioned earlier.
2. Using the SMART App:
You can also use the SMART App to check your SIM registration status. First, download and log in to the app on your phone. Once logged in, look beside your number—it will show whether your SIM is registered or not. This method is easy, especially if you regularly use the app.
3. Using the SIM Registration Portal:
Another way to check is by going to the SIM registration portal. Visit smart.com.ph/simreg and follow the same steps you used when you initially registered. After completing these steps, the portal will tell you if your SIM is successfully registered.
Using SIM Requirements for Foreign Nationals
If you are a foreign national and wish to use a SIM card in the Philippines, specific requirements apply based on your visa type. This guide will explain the documents you need to submit when registering your SIM.
For Tourists
If you’re visiting on a tourist visa, you’ll need the following documents to register your SIM:
- Passport
- Return ticket
- Proof of Philippine address
The SIM card issued to tourists will be valid for 30 days. However, you can extend this period by submitting mandatory company details if necessary. Tourists must take note that the 30-day validity restriction applies unless they have a different type of visa.
For Other Visa Holders
If you are a foreign national with a visa other than a tourist visa, you can register your SIM without the 30-day limit. However, you will need the following documents:
- School registration (for students)
- Proof of Philippine address
- Passport
- ACRI-Card
- Alien Employment Permit (issued by DOLE)
- Travel or admission documents
- Student ID
These documents ensure that all foreign nationals using SIM cards in the Philippines follow the registration process properly. By providing the correct documentation, you will have access to uninterrupted SIM card usage during your stay.
What to Do If SIM Registration Fails?
If your Smart SIM registration has failed, your calls, text, and internet service will be disconnected. As a customer, you won’t be able to access your balance. The only way to get back your service is through reactivation, following the same method as registering a new SIM. Completing this procedure is essential, or the cost will be losing your services permanently.
Smart SIM Card Plans and Promos
Prepaid Plans:
For users looking for simple, pay-as-you-go options, Smart’s prepaid plans offer flexibility and affordability.
| Plan Name | Price | Description | How to Activate |
|---|---|---|---|
| Smart50 | ₱50 | 50GB data, unlimited calls to Smart and TNT | Text SMART50 to 9999 |
| Smart99 | ₱99 | 99GB data, unlimited calls to Smart and TNT | Text SMART99 to 9999 |
| Smart199 | ₱199 | 199GB data, unlimited calls to Smart and TNT | Text SMART199 to 9999 |
| Smart399 | ₱399 | 399GB data, unlimited calls to Smart and TNT | Text SMART399 to 9999 |
| Smart599 | ₱599 | 599GB data, unlimited calls to Smart and TNT | Text SMART599 to 9999 |
Postpaid Plans:
Postpaid users can enjoy larger data allocations and added perks, ensuring continuous service throughout the billing cycle.
| Plan Name | Price | Description | How to Activate |
|---|---|---|---|
| Data Plan 199 | ₱199 | 10GB data, unlimited calls to Smart and TNT | Subscribe through the GigaLife app or visit a Smart Store |
| Data Plan 299 | ₱299 | 20GB data, unlimited calls to Smart and TNT | Subscribe through the GigaLife app or visit a Smart Store |
| Data Plan 399 | ₱399 | 30GB data, unlimited calls to Smart and TNT | Subscribe through the GigaLife app or visit a Smart Store |
| Data Plan 499 | ₱499 | 50GB data, unlimited calls to Smart and TNT | Subscribe through the GigaLife app or visit a Smart Store |
| Data Plan 699 | ₱699 | 80GB data, unlimited calls to Smart and TNT | Subscribe through the GigaLife app or visit a Smart Store |
Data Promos and Bundles:
Smart offers a variety of data promos and bundles for specific needs, like streaming, gaming, and texting.
| Promo Name | Price | Description | How to Activate |
|---|---|---|---|
| SurfMax | Varies | Unlimited data for browsing and social media | Text SURFMAX to 9999 |
| WatchAll | Varies | Unlimited streaming on selected platforms | Text WATCHALL to 9999 |
| GameOn | Varies | Unlimited data for mobile gaming | Text GAMEON to 9999 |
| TextMore | Varies | Unlimited text messages to all networks | Text TEXTMORE to 9999 |
Activation Made Easy with the GigaLife App:
For convenience, the GigaLife app allows you to explore and subscribe to all Smart promos and plans in just a few taps. You can download the app from the Google Play Store or Apple App Store.
Video Guide For Smart Sim Registration
How to Register as a Smart PLDT Customer
To register as a PLTD customer, follow these simple steps:
- Go to the Post Paid Registration link provided by Smart.
- Enter your PLDT landline number to start the registration process.
- Complete your profile by filling in all the required details.
- Upload your government ID after adding your basic details.
- Save your control number at the end for future reference.
FAQS
How to Easily Register Your Globe SIM
To register your Globe SIM card by yourself, simply visit the Globe registration portal. Start by entering your mobile phone number and providing the necessary personal information. You’ll then need to upload a valid government ID and take a quick selfie for identity verification. Once all your details are submitted and verified, your SIM will be successfully registered, and you’re all set!
How to activate a smart SIM card?
To activate your Smart SIM, follow these simple steps. First, insert the SIM into your phone and switch it on. For postpaid users, visit the Smart website and log in to your account. There, you’ll need to enter your SIM card number and phone number. Follow the on-screen instructions to complete the process. Once done, your SIM will be fully activated and ready for use.
How to Retrieve Your Smart SIM Registration Reference Number
If you ever forget your reference number after completing your Smart SIM registration, there are a few easy steps you can follow to retrieve it. First, you can log in to the GigaLife app where you can view all the details related to your SIM, including the reference number. Make sure you have your OTP and other required details ready to access your account. Alternatively, you can reach out to customer service or even contact Facebook support for assistance. Once verified, they’ll send a confirmation message containing the reference number you need.
How Much Time Registration Will Take After Submitting an Online Form?
Once you’ve submitted your Smart SIM registration form online, the process to get your SIM activated typically takes up to 24 hours. However, filling out the form itself is quick and can be done in just 5 minutes. After that, you’ll need to wait for the system to process your information before your SIM becomes fully activated. It’s a simple and straightforward process that ensures your registration is completed in a timely manner.